Wednesday, March 2, 2016

One more toy truck.....

Remember this post about having to build my youngest a truck of her own?? Well, the other day I happened to be in my one of my favorite local salvage shop's when I spotted a toy truck. I liked the truck, I did not like the price ($60....no thanks). I asked the owner if I could take a picture of it, knowing that I could make my own version a WHOLE lot cheaper.


Ready to see what a $60 toy truck looks like???? Here you go.....


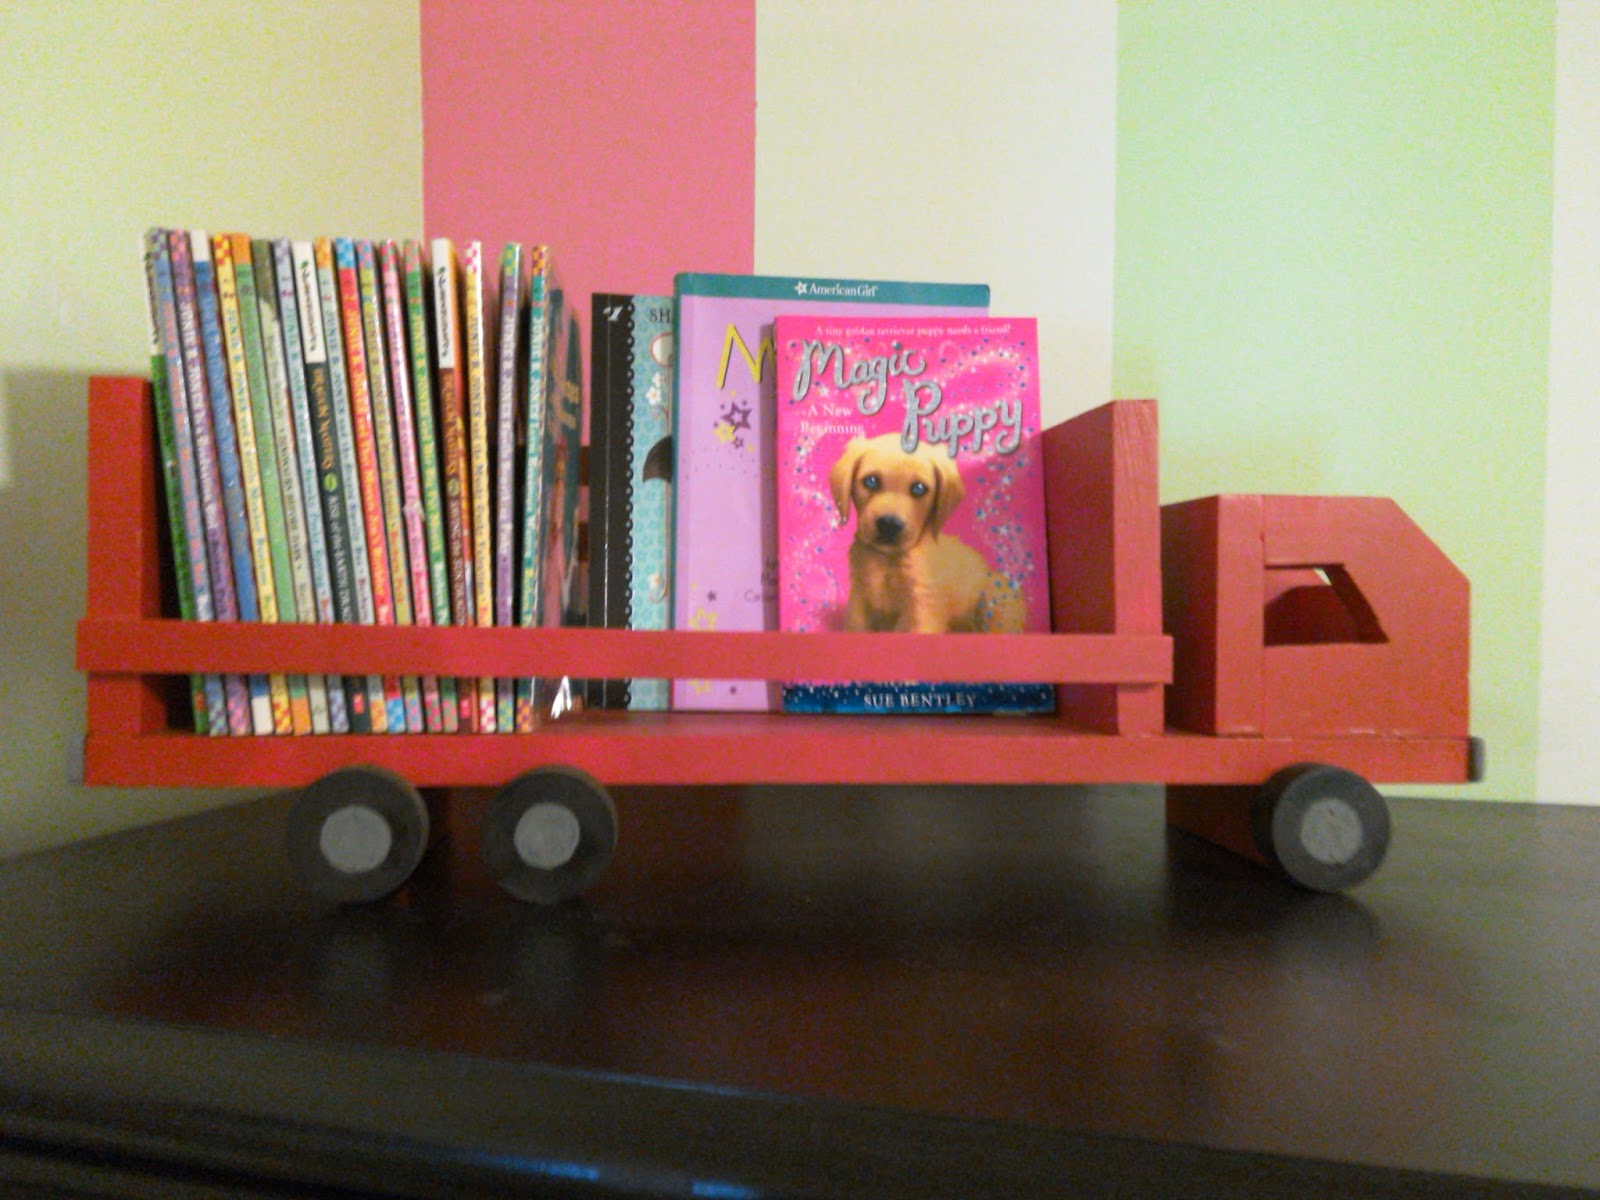
When I got home I dug through my scrap pieces and built this.......
A rainbow trailer at my youngest request


Now I know I changed the design a bit but that's called creative freedom. I love the addition of the hitch for the trailer. I am also pretty excited about the washer rims. Ready for the cost??? This only cost me 11 cents to build. I say that's a steal!!!


The best thing is my daughter loves it and plays with everyday. The only problem is now she wants to keep both trucks. I guess I will be making another one very soon.

Monday, February 22, 2016

DIY Dog Food Storage Container

I finally finished my dog food storage container. I was inspired by the plans over at Addicted 2 DIY http://addicted2diy.com/2015/07/31/diy-dog-food-station-with-storage/ along with plans at Build Something.com. Although I really liked the one at Addicted 2 DIY, I felt it need a bit more for my taste. Using the one at Build Something as my inspiration, I was able to modify the plans from Addicted 2 DIY to come up with mine.


I finished the bottom using Rust-Oleum Chalked paint in Charcoal and Chalked Protective Topcoat in matte clear.


This was my first experience with this line of Rust-Oleum and it will not be my last! I love that one coat of the Chalked Charcoal was all I need do, no priming needed. The coverage was smooth and even. Even though applied with a brush, I saw no brush strokes when dried. One note though, I am glad I read the directions because shaking the container is not recommended. The matte clear finish goes on creamy but dries clear, protects your build and leaves a nice smooth finish when dry. Again I only used one coat and did not sanded between the painting and applying the protective topcoat.


For the top I used Rust-Oleum Varathane Fast Drying Stain in Gunstock. I absolutely love the color!!!


Varathane is a fast drying stain and a bit thicker than other stains I have used. The application was very easy. I applied using a rag, the coverage was smooth and even. I will be trying more colors, in fact the line even includes reds, blues and oranges. I finished with 2 coats of a satin poly I had.


The dog and cats love it.

 I love how it blends in with the house.


As a fan of Rust-oleum Painter's Touch Ultra Coverage 2x Spray Paint, I am glad I was given the opportunity to try other products by them. Having never before used any brand of chalk paint, I was completely surprised by it. I love how there is really no need to prime before painting. The coverage is even and the finish is beautiful, even without the protective topcoat(although I recommended using it). The Varathane stain was a breeze to use. The coverage was even and beautiful. And like the name says, it really did dry quick. Another plus I did not notice an odor, like I have with other stains.


Another great thing about Rust-oleum is Creators's Studio, This online community is one of a kind. What makes this site different from others, is the interaction with the Rust-oleum moderators (who are great), the online polls, the challenges and rewards. This is site is full of wonderful people of all levels of DIY'ing. I have found the interaction between members to be really great. I think if you are even slightly interested in DIY you need to sign up (which is FREE).


Disclaimer- Although Rust-oleum  supplied me with the products for my use, all opinions are 100% my own.

Sunday, February 21, 2016

One thing leads to another....

When I saw this truck shelf by That's My Letter floating around all over social media at Christmas time, I knew I wanted to make it. Being a mom to two girls however meant I really didn't build trucks (or so I thought).


A few weeks ago, I was over taken with the building bug! It was a lazy Sunday and I just wanted to be building. As luck would have it, my nephew was turning 3 that week. Down to my work shop I went, I grabbed my plans and dug around in my scrap pile (because I used scraps, I had to modify the plans to fit what I had). 


And built this handsome fella!


The following Saturday we headed to his party. He opened his truck and set out to play with it. Sadly, this truck isn't a toy (the wheels are only on the front and do not turn) and he wasn't feeling it. Not wanting to disappoint the birthday boy, I promised to make a truck that he could play with and that I did!


Now here's the problem, my quality control checker (aka youngest) doesn't seem to want to give it up.


And now I am in the process of not only building another truck but a trailer to hitch on to it. According to my quality control inspector there isn't enough room for all her stuffies.

See how one thing leads to another and another.........


Wednesday, February 10, 2016

Build Something!

As someone who is newish to sharing my projects on social media I was super excited when I saw this ....

Photo credit Build Something
My projects were featured on Build Something's Instagram account yesterday and Facebook today!!!!

This is a HUGE deal for ME!!!!

I love building and creating and to have such an awesome online community share my work
just about knocked me off my feet!!!!!

The pictures on the left are free plans that you can find on Build Something.
The pictures on the right are my take on them.

The workbench is made by Brad the creative force behind Fix This Build That.
Brad's plans are just awesome! So easy to follow!!!
I was able to build the workbench in a weekend.
Which is a good thing because my youngest has requested one of her own.
Luckily, the plans are easily adaptable.
Because I am going to need to make it a few inches taller for her.

The tool box is made by Jen the creative force behind The House of Wood.
I made the tool box after seeing Jen's photo on Build Something.
I honestly did not use her plans.
However, I did look them over just now and they seem super easy to follow!

If you haven't heard of Build Something, it is this AWESOME online community of builders.
You can share your plans, find FREE plans, share your projects and get help from others.
Plus a really cool bonus, when you share your first set of plans on the site you get a free shirt!!!!

This shirt is SERIOUSLY soft!!!!
And I can say without a doubt, it really helps me to
Build Something!


Sunday, January 24, 2016

You can make it too!

A while back I spotted an easel in Michael's flyer. I knew my girls would love it. So I snap a picture with my phone and added it to my DIY inspiration album (doesn't everyone have one on their phone).
 
See it in back there??
A couple weeks ago I was looking through the album for inspiration of my next project and decided it was time to finally make them (see that, the album works).


The great part about this is I wrote up plans over at Build Something. If you would like to make your own or just see how I did you should stop by. This is a great online community for builders. You can find free plans and get some support from others. You don't have to join but I recommend you do (it's free).

If you do make one please post a picture and tag #sawitmadeit. I would love to see your version!


Sunday, January 10, 2016

DIY Doll Closet/Vanity

My youngest loves her dolls! She loves playing with them, combing their hair and dressing them. Because of this, she also has a LOT of clothes. Clothes that I find everywhere, except for that shirt she just has to have and then I have to look everywhere for it! Hopefully, this DIY doll closet/vanity will help both from happening anymore. You notice I said hopefully!


This was a really quick and easy project. Sadly, I didn't take any pictures while doing it. So I will just tell you what I did.


I used this wood crate for the closet and spray painted it white. The rod is a half inch dowel that I cut to fit and spray painted. I attached it to the crate using gorilla wood glue and a brad nailer. I cut the bottom shelf to fit, painted and attached it as I did the rod. The green buckets I found at the dollar store (originally I had two yellow buckets that I spray painted to match but they started to flake off after a day of use. So that little diy experiment was a big fail).


The vanity was really simply as well. I used scrap wood for the desk. I spray painted it to match the rod and attached it just like everything else. The mirror is $1 wood frame I found at a local craft store and spray painted. I had some scrap mirror left over from another project that I cut to fit. I used gorilla glue to attach the mirror to the frame. The seat is a little wood crate I found at Target in the dollar bin section by chance. I glued a scrap piece of wood to the back, spray painted it and was done!


Even McKenna wears mismatched socks

I think McKenna approves!


 I almost forgot.....
My youngest picked out the color.
With my OCD I would of never selected a different color from the closet.
I made this rack because even the dolls in our house have a shoe problem!


If you want to make your own and have any questions, just let me know.

Wednesday, January 6, 2016

My DIY Jewelry Cabinet

It's said that the imitation is the best form of flattery and I agree!

When I first saw this jewelry organizer on Pinterest I knew I wanted to make it for my daughter's Christmas gift. I kept putting it off and before I knew it, there was less than 2 weeks until Christmas. Working full-time third shift, I figured there was no way I could get it done. I gave in and decided to make her a mirror, like I made myself using this tutorial. (It just so happens that both mirrors are created by Shanty 2 Chic. If you haven't every checked them out, do so!!!!) Once I got to my favorite orange store, I just could not give up on my original plan. Not having the plans for the one I saw I decided to wing it and create my own.


Here's what I did.....
I knew I wanted a cork board on the back side of the mirror. By using my router, I was able to inset the mirror and place the cork board on the back.

Here you can see the grove for the mirror and cork board.
I then used J hooks for holding the necklaces. I placed dowels vertically to hold both rings and bracelets. I placed one 1/2" dowel across for bracelets with a clasp. My daughter loves earrings and I knew her collection would only continue to grow. I struggled with the idea of how to store them. Finally, I decided to use the plastic canvas I used as a child for cross stitching. It works GREAT!!! I used J hooks again, along with binding rings to hang it up (after about a hour on Christmas day, my daughter and had attached all her earrings to the canvas). I left one shelf for her to use as storage.


I just love the gold!!!
The last step was to add the hinges. I figured all hinges were the same, sadly they are not. The ones I purchased would not work. Because I created the door to sit right on the frame, the only hinges I could use were the European hinges. Let me tell you, when I discovered this I almost scraped the whole thing. Those hinges scared me!!!! What if I attempted and I ruined the cabinet?!?!?! I sucked it up, bought the hinges and the drill bit and said here goes. Guess what I did it!!!!!!! And to tell the truth I could not be prouder of myself.
Still can't believe I did it!!!!
I am so glad I went with my original plan, the cabinet was a big hit on Christmas morning!!!


What do you think, would you find my version flattering???


I shared this over at Ryobi Nation. If you wouldn't mind stopping by and voting for it, I would be super thankful!